
Using the report page, you will be able to run reports, review previously completed reports, and print and export reports.
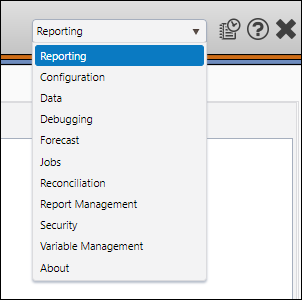
- Select Reporting from the Navigation Toolbar.
- Click on the Report tab, and then the Report page.
What you can do on this Page
Running reports is a three part process that will require:
- Selecting the report you intend to run
- Setting up your report's options
- Selecting the data to include in your report
After accessing the Report page, follow the steps below to run your reports:
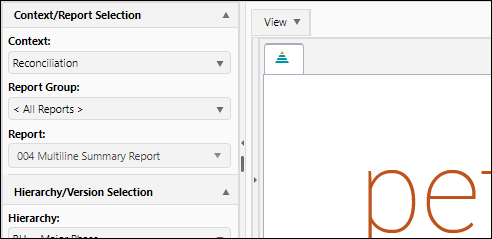
- Select the report you wish to run using the drop-down menus in the in the Context/Report Selection pane:
- Select the context that contains the data you wish to report on using the Context drop-down menu.
- (Optional) Select a report group from the Report Group drop-down menu. Doing so will reduce the number of reports that are included in the Report drop-down menu.
- Select the report you intend to run using the Report drop-down menu.
If no report group is selected, all of the reports in your Reserves instance that are eligible for use in the context you have selected will be listed in the Report drop-down menu. - Select the version of your data you wish to use for your report, and a hierarchy used to display your data using the drop-down menus in the Hierarchy/Version Selection pane:
- Select the hierarchy you wish to use to organize your data from the Hierarchy drop-down menu.
- Select a version of your data using the Version drop-down menu.
- (Optional) Use the Version Filter drop-down menu to select a version filter. This will limit the number of versions available in the Version drop-down menu.
- Select a version of your data using the Version drop-down menu.
- (Optional) Use the Filter drop-down menu to choose and activate an attribute filter. Once an attribute filter has been activated, only the objects that are consistent with the attribute filter will be displayed in the hierarchy.
Provided you have the appropriate permissions, you will be able to create custom hierarchies. See The Dynamic Hierarchies Page for more information.For more information on attribute filters, see The Attribute Filters Page. - Access the Report Options page and set up your report's options. See The Report Options Page for more information.
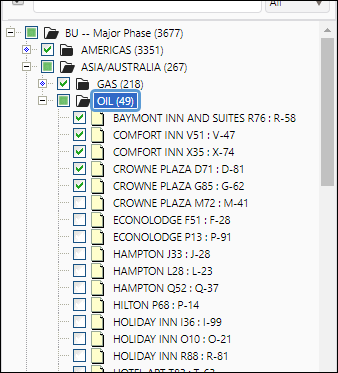
- Use the hierarchy to run the report. This is done by selecting a level, or an object within the hierarchy. In the example below, the OIL level was selected to initialize the report, and five objects were included in the report. When initializing reports, remember that every active object or level that exists within the level you select will be included in your report. You can prevent objects or levels from being included in your reports using the checkboxes beside levels and objects in your hierarchy.
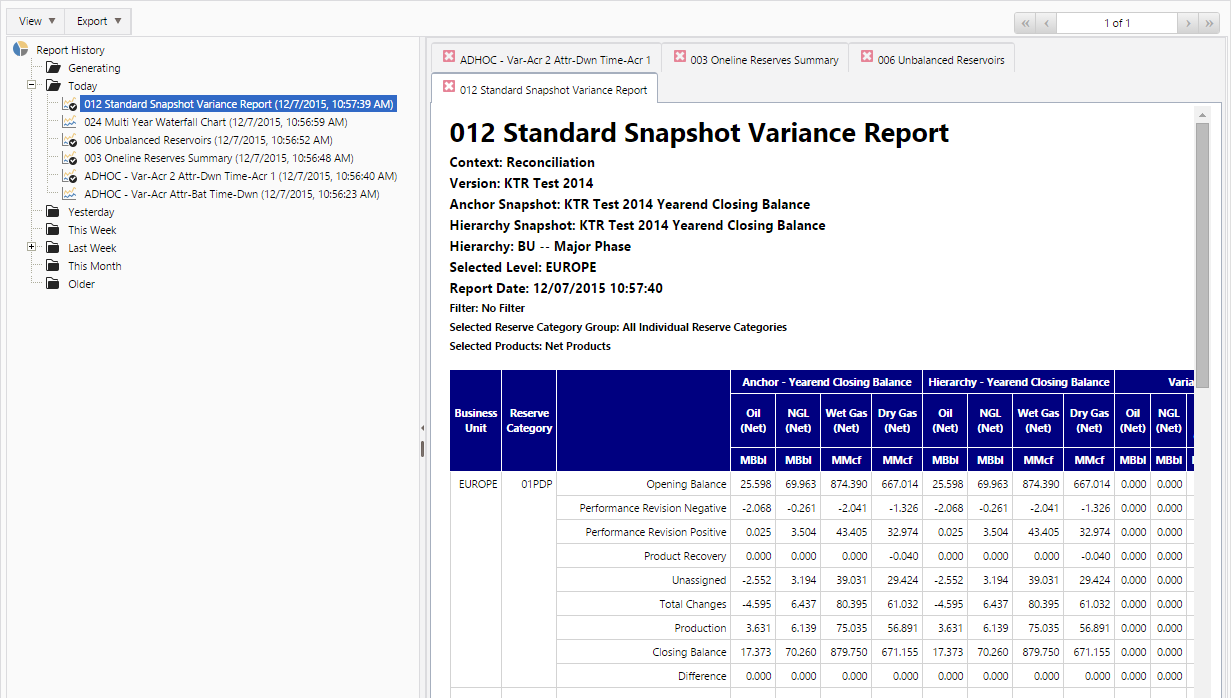
- After clicking on your hierarchy, Reserves will begin generating the report. You can monitor the progress of the report on The Job Results Page. During this time, you can configure and launch additional reports. If you are still using the Report page when your report is completed, it will open automatically. If your report is completed while you are using another page in Reserves, you will need to use the Report History pane to view it (see View a List of Previously run Reports below for more information).
Click image to expand or minimize.
All of the reports you run will be added to the Report History pane, and will be available here even after they have been opened. Reports will be stored here for as long as your caching options permit.
After opening the Report History pane, all of the reports you have run will be listed on screen in the order that they were completed, and sorted into folders based on the time when they were run. Reports that are running and have not completed will be listed in the Generating folder.
Click image to expand or minimize.
Selecting one of the reports listed in the pane will load and render it on the Display pane, in its own tab. The icon beside reports that are rendered will change. Expanding the folders in this pane will allow you to view additional reports run in various date ranges.
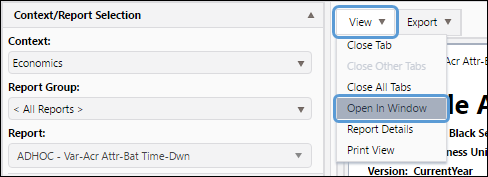
Each time you run a report, it will be added to its own tab in the Display pane. To view the report in a new browser window, click View and select Open In Window.
The report will be added to a new browser window. Now, you can reconfigure the report's options, rerun the report and compare the result.
In Reserves 5.5.3, you can open reports in a Print View window.
To open a report in a print view, click View and select Print View.
A print preview of your report will open in a new window. From here, you can print the report by right-clicking on it and selecting Print..., or pressing CTRL + P on your keyboard.
Click image to expand or minimize.
When using Google Chrome
When the Print window opens, you will need to enable the Background graphics option. This will ensure that colors are rendered properly when the report is printed.

Click image to expand or minimize.
Use the export function to quickly convert a report’s data into different file types. You will be able to export reports into the following formats:
- Text (tab-delimited): Converts the contents of the report into a tab-delimited text format.
- Text (Column-delimited): Converts the contents of the report into a column-delimited text format.
- Text (Comma-delimited): Converts the contents of the report into a comma-delimited text format.
- HTML: Converts the contents of the report into raw HTML.
- PDF: Converts the contents of the report into a PDF.
- Excel: Converts the contents of the report into an Excel workbook.
- Word: Converts the contents of the report into an Word document.
To export a report, follow these steps:
- Click on Export in the upper-left hand corner of the Display pane.
- Choose the file format you would like to export your report into. PDF, Excel, and Word formats are all availalable.
Click image to expand or minimize.
- An export options screen will appear where you can choose the options for your export. These options will differ based on the export type you choose. See an example below:
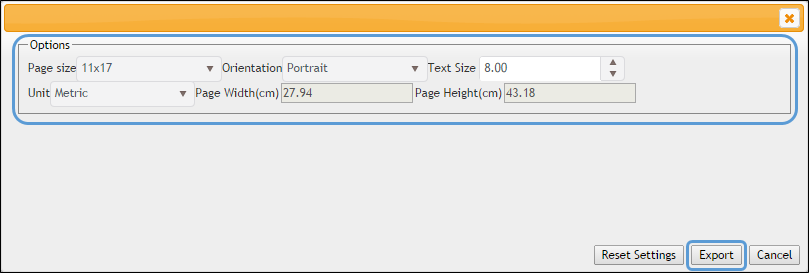
Click image to expand or minimize.
- When you have configured your export options, click Export.
- A file containing your report's data will be downloaded.
If you haven't done so already, consider creating a custom hierarchy to organize your data when reporting. This can be done using The Dynamic Hierarchies Page.
The Report Page
Using the report page, you will be able to run reports, review previously completed reports, and print and export reports.
- Select Reporting from the Navigation Toolbar.
- Click on the Report tab, and then the Report page.
Click image to expand or minimize.
Running (Generating) Reports
Running reports is a three part process that will require:
- Selecting the report you intend to run
- Setting up your report's options
- Selecting the data to include in your report
After accessing the Report page, follow the steps below to run your reports:
- Select the report you wish to run using the drop-down menus in the in the Context/Report Selection pane:
- Select the context that contains the data you wish to report on using the Context drop-down menu.
- (Optional) Select a report group from the Report Group drop-down menu. Doing so will reduce the number of reports that are included in the Report drop-down menu.
- Select the report you intend to run using the Report drop-down menu.
If no report group is selected, all of the reports in your Reserves instance that are eligible for use in the context you have selected will be listed in the Report drop-down menu. - Select the version of your data you wish to use for your report, and a hierarchy used to display your data using the drop-down menus in the Hierarchy/Version Selection pane:
- Select the hierarchy you wish to use to organize your data from the Hierarchy drop-down menu.
- Select a version of your data using the Version drop-down menu.
- (Optional) Use the Version Filter drop-down menu to select a version filter. This will limit the number of versions available in the Version drop-down menu.
- Select a version of your data using the Version drop-down menu.
- (Optional) Use the Filter drop-down menu to choose and activate an attribute filter. Once an attribute filter has been activated, only the objects that are consistent with the attribute filter will be displayed in the hierarchy.
Provided you have the appropriate permissions, you will be able to create custom hierarchies. See The Dynamic Hierarchies Page for more information.For more information on attribute filters, see The Attribute Filters Page. - Access the Report Options page and set up your report's options. See The Report Options Page for more information.
- Use the hierarchy to run the report. This is done by selecting a level, or an object within the hierarchy. In the example below, the OIL level was selected to initialize the report, and five objects were included in the report. When initializing reports, remember that every active object or level that exists within the level you select will be included in your report. You can prevent objects or levels from being included in your reports using the checkboxes beside levels and objects in your hierarchy.
- After clicking on your hierarchy, Reserves will begin generating the report. You can monitor the progress of the report on The Job Results Page. During this time, you can configure and launch additional reports. If you are still using the Report page when your report is completed, it will open automatically. If your report is completed while you are using another page in Reserves, you will need to use the Report History pane to view it (see View a List of Previously run Reports below for more information).
Click image to expand or minimize.
View a List of Previously run Reports
All of the reports you run will be added to the Report History pane, and will be available here even after they have been opened. Reports will be stored here for as long as your caching options permit.
After opening the Report History pane, all of the reports you have run will be listed on screen in the order that they were completed, and sorted into folders based on the time when they were run. Reports that are running and have not completed will be listed in the Generating folder.
Click image to expand or minimize.
Selecting one of the reports listed in the pane will load and render it on the Display pane, in its own tab. The icon beside reports that are rendered will change. Expanding the folders in this pane will allow you to view additional reports run in various date ranges.
View a Report in a Separate Window
Each time you run a report, it will be added to its own tab in the Display pane. To view the report in a new browser window, click View and select Open In Window.
The report will be added to a new browser window. Now, you can reconfigure the report's options, rerun the report and compare the result.
Open a Report in a Print View
In Reserves 5.5.3, you can open reports in a Print View window.
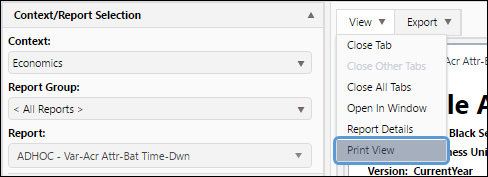
To open a report in a print view, click View and select Print View.
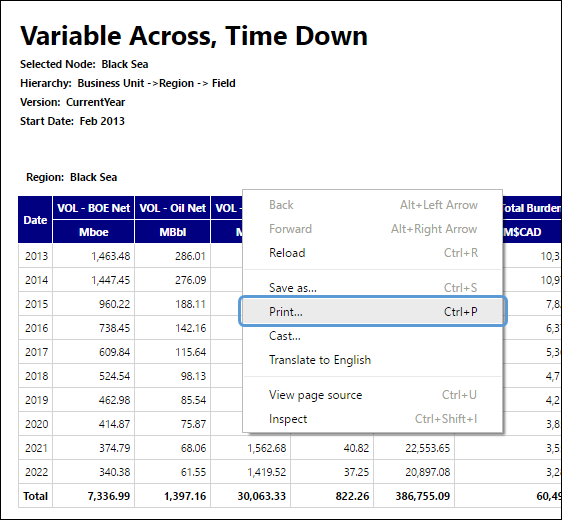
A print preview of your report will open in a new window. From here, you can print the report by right-clicking on it and selecting Print..., or pressing CTRL + P on your keyboard.
Click image to expand or minimize.
When using Google Chrome
When the Print window opens, you will need to enable the Background graphics option. This will ensure that colors are rendered properly when the report is printed.
Click image to expand or minimize.
Export a Report
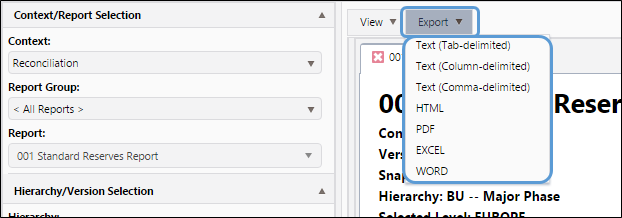
Use the export function to quickly convert a report’s data into different file types. You will be able to export reports into the following formats:
- Text (tab-delimited): Converts the contents of the report into a tab-delimited text format.
- Text (Column-delimited): Converts the contents of the report into a column-delimited text format.
- Text (Comma-delimited): Converts the contents of the report into a comma-delimited text format.
- HTML: Converts the contents of the report into raw HTML.
- PDF: Converts the contents of the report into a PDF.
- Excel: Converts the contents of the report into an Excel workbook.
- Word: Converts the contents of the report into an Word document.
To export a report, follow these steps:
- Click on Export in the upper-left hand corner of the Display pane.
- Choose the file format you would like to export your report into. PDF, Excel, and Word formats are all available.
Click image to expand or minimize.
- An export options screen will appear where you can choose the options for your export. These options will differ based on the export type you choose. See an example below:
Click image to expand or minimize.
- When you have configured your export options, click Export.
- A file containing your report's data will be downloaded.
Creating Custom Hierarchies
If you haven't done so already, consider creating a custom hierarchy to organize your data when reporting. This can be done using The Dynamic Hierarchies Page.